
LoRA Not Working in AI Art? How to Fix Trigger Words, Weight, and Model Compatibility
 0
0
 0
0
You’ve loaded a LoRA you’ve been wanting to use. You generate an image. Nothing changes. Or worse—it changes in a completely unexpected way.
The character doesn’t appear. The style barely registers. The clothing details are missing. You’ve tried adjusting the weight, changing the prompt, regenerating multiple times. Still nothing. At this point, you’re wondering if the LoRA is broken, if your setup is wrong, or if you’re missing something obvious.
The truth is: a LoRA that looks “broken” is rarely actually broken. It’s usually a problem with trigger words, weight settings, base model compatibility, or prompt conflicts. These are fixable issues—once you know what to look for.
Quick Answer: Why Your LoRA Is Not Working
A LoRA not working typically comes down to one or more of these issues:
Missing trigger word. Some LoRAs require a specific activation phrase. Without it, the LoRA has little to no effect, no matter how high you set the weight.
Incorrect trigger word. A misspelled or misunderstood trigger word won’t activate the LoRA’s intended effect.
LoRA weight too low. A weight below 0.5 often produces barely visible results. The LoRA exists but doesn’t meaningfully affect the output.
LoRA weight too high. A weight above 1.0 can distort the image or cause the LoRA’s effect to overwhelm the rest of your prompt.
Base model incompatibility. The LoRA was trained on a different model type. Some LoRAs work beautifully with one model and barely at all with another.
Prompt conflict. Your text prompt asks for something that directly contradicts the LoRA’s intent, and the model gets confused about which instruction to follow.
Multiple LoRAs fighting. If you’re using several LoRAs at once, they may be competing for visual control, diluting the effect of the one you wanted to use.
Missing or Wrong Trigger Words
This is the most common reason a LoRA doesn’t work.
Many LoRAs require a specific trigger word to activate. This is a keyword or short phrase that tells the model “use this LoRA’s special capabilities now.” Without it, the LoRA may still have some effect, but it will be weak and unreliable.
For example, a character LoRA might require the trigger word “smmile” or a style LoRA might need “oil painting style.” These aren’t suggestions—they’re essential. If your prompt doesn’t include the exact trigger word, the LoRA’s full potential won’t activate.
Some LoRAs have multiple trigger words for different effects. A character LoRA might use “smmile” for the character’s base appearance and “smmile, red hair” to change the hair color specifically. Check the creator’s documentation to understand all available triggers.
The challenge is that trigger words aren’t always obvious. They might be abbreviations, stylized spellings, or descriptive phrases. This is where the LoRA creator’s notes become essential. Before loading a LoRA into PixAI, always check its description or documentation for the recommended trigger words.
If the description is vague or missing, the LoRA creator may have left hints in the LoRA’s name. If you’re still unsure, the simplest approach in PixAI is to test: try the prompt without any trigger words, then add a likely candidate, and compare the results directly inside PixAI. The difference should be immediately obvious.
LoRA Weight Is Too Weak or Too Strong
LoRA weight controls the strength of the LoRA’s effect on the final image. But there’s no universal “best” weight. Different LoRAs, different base models, and different artistic goals require different weight settings.
A weight of 0.3 might be too subtle—the LoRA barely affects the output. A weight of 1.5 might be too aggressive—the LoRA overpowers your prompt and distorts the image. The sweet spot is often somewhere between 0.6 and 0.9, but testing is always necessary.
Character LoRAs and style LoRAs often need different approaches. A character LoRA might need a higher weight (0.8–1.0) to clearly establish the character’s appearance. A style LoRA might work better at a lower weight (0.5–0.7) so it influences the art style without overwhelming character details.
The problem many users encounter is making large weight jumps and then being confused about what worked. If weight 0.3 doesn’t work and weight 1.0 produces distortion, you haven’t narrowed down the problem. Instead, test incrementally: try 0.5, then 0.7, then 0.8, and observe how the output changes.
PixAI’s weight slider makes this testing fast. You can adjust the weight by 0.1 increments and see real-time previews of how the LoRA responds. This eliminates guesswork—you can literally watch the effect strengthen or weaken as you move the slider.
Base Model Mismatch
This is one of the most overlooked reasons why a LoRA fails.
LoRAs are trained on specific base models. A LoRA designed to work with the Deliberate model won’t necessarily work well with the ChilloutMix model, even though both are anime models. They have different architectures, different training data, and different visual biases.
When a LoRA is incompatible with your base model, the effect might be completely absent, extremely distorted, or unstable—changing dramatically with small prompt changes. You might blame the LoRA’s quality or your settings when the real issue is that they were never meant to work together.
This is especially common if you’re using an older LoRA on a newer model, or a specialized LoRA on a general-purpose model. The visual language they’re trained to speak is fundamentally different.
The fix is testing. Before spending time adjusting weights and prompts, verify that the LoRA works with your chosen model at all. In PixAI, this means generating the same prompt with the same LoRA across two or three compatible anime models and seeing if the effect shows up in at least one of them.
If the LoRA works beautifully in Model A but barely registers in Model B, the issue is compatibility, not the LoRA itself. Switch to Model A and continue fine-tuning from there. If the LoRA produces poor results across multiple models, then you might genuinely need to adjust settings or reconsider using that particular LoRA.
When Your Prompt Fights Against the LoRA
A LoRA can fail not because it’s broken, but because your prompt contradicts it.
Imagine you’re using a character LoRA designed for long black hair, but your prompt says “short blonde hair.” The model receives two competing instructions: the LoRA pushing toward one aesthetic, the prompt pushing toward another. The result is usually unstable or compromised—the image might distort, lose coherence, or ignore one of the instructions entirely.
The same issue happens with style LoRAs. If your LoRA is designed to generate oil paintings but your prompt includes “photorealistic,” you’re fighting the LoRA’s intended effect. The model gets confused about which direction to take.
Outfit LoRAs, pose LoRAs, and expression LoRAs all face the same problem. If the LoRA specializes in one thing and your prompt asks for something different, the model will struggle.
Negative prompts can amplify this issue. If your LoRA is trying to add specific details and your negative prompt excludes those same details, you’re working against yourself.
The troubleshooting approach is simple: start with a minimal prompt. If you’re testing a character LoRA, use just the trigger word and the character name. Don’t add competing descriptions. Generate a few results to confirm the LoRA works as intended. Once you have a baseline, gradually add more prompt details and monitor whether the LoRA’s effect remains strong.
Character LoRA vs Style LoRA—Different Troubleshooting Approaches
Different LoRA types have different expectations and require different troubleshooting strategies.
A character LoRA is designed to reproduce a specific character’s appearance: their face, hair, clothing, distinctive features. These LoRAs typically need a clear trigger word, a consistent base prompt, and stable settings. Testing a character LoRA means verifying that the character’s identity reproduces reliably across multiple generations.
A style LoRA, by contrast, is designed to influence the overall visual aesthetic without locking you into specific character details. It might push the art toward a particular style, lighting approach, or visual treatment. Style LoRAs often work better at lower weights—they should enhance your prompt, not overpower it.
Concept LoRAs (for specific objects, clothing, poses, or expressions) fall somewhere in between. They need trigger words to activate but don’t require the rigid consistency of character LoRAs.
If you’re unsure which type you’re using, check the LoRA creator’s description. But here’s a practical rule: if the LoRA is named after a character, treat it like a character LoRA. If it’s named after a style or concept, treat it like a style LoRA. Test accordingly.
How to Test LoRA Settings in PixAI
Instead of randomly adjusting settings and hoping something works, follow a systematic approach.
Step 1: Choose a compatible model. If the LoRA creator recommends a specific model, start there. If not, pick one or two anime models that match the LoRA’s intended style. This removes model incompatibility from the equation.
Step 2: Start with a simple prompt. Don’t write a complex, detailed prompt. Use 10–15 words describing the character or style you want. This creates a stable baseline for testing the LoRA.
Step 3: Add the trigger word. Include the LoRA’s trigger word in your prompt. Generate a result and observe whether anything changes compared to the prompt without the trigger word.
Step 4: Test LoRA weight gradually. Start at 0.5, generate an image, then bump it to 0.7, then 0.9. Take note of how the effect strengthens or weakens. This teaches you the LoRA’s sensitivity.
Step 5: Check for prompt conflicts. If the LoRA’s effect is weak, simplify your prompt further. Remove descriptors that might contradict the LoRA’s intent.
Step 6: Test multiple models. Use the same prompt, trigger word, and LoRA weight with a different anime model. Compare the results. If the LoRA works better in one model, model compatibility might have been the issue all along.
Step 7: Change one variable at a time. Don’t rewrite your prompt, change the model, and adjust the weight simultaneously. Change one thing, generate, observe. This isolates what’s actually affecting the result.
Step 8: Compare results side-by-side. Once you’ve narrowed down the best settings, generate multiple variations with the same configuration. This confirms whether the result is consistent or if the LoRA’s effect is unstable.
PixAI’s interface supports all of these steps without any local setup. You can adjust weights with sliders, switch models instantly, compare images side-by-side, and iterate quickly. The goal is to isolate the actual problem instead of changing everything at once and hoping for the best.
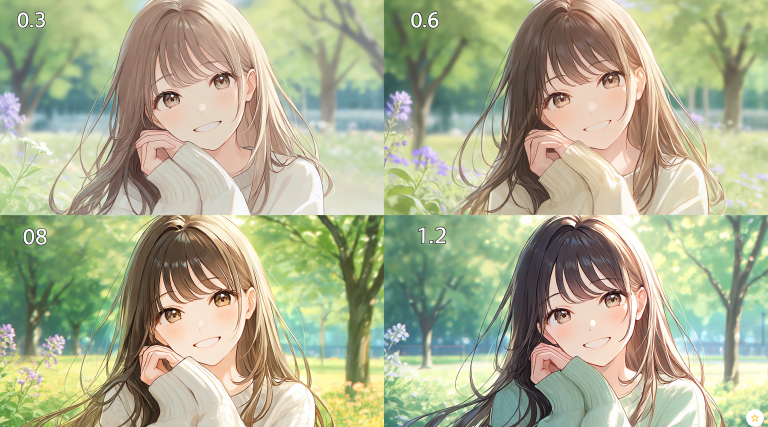
Mini Test Example: Seeing LoRA Weight in Action

Here’s a realistic example of how LoRA weight affects output.
Prompt: “smmile anime girl, smiling”
Model: ChilloutMix
LoRA: Character LoRA (smmile)
At LoRA weight 0.3: The character’s base features barely appear. You get a generic anime girl that could be anyone. The trigger word is working, but the weight is too low to define the character.
At LoRA weight 0.6: The character’s distinctive features start to show. The face is more recognizable. The hair and clothing are closer to the character’s design.
At LoRA weight 0.8: The character’s appearance is clear and distinctive. Details are sharp. This is often the sweet spot for character LoRAs—strong enough to define the character but not so strong that it distorts.
At LoRA weight 1.2: The character’s features are exaggerated or the image becomes distorted. The LoRA is overwhelming the model’s default behavior and creating visual artifacts.
This progression demonstrates why testing incrementally matters. If you only tried 0.3 and 1.2, you’d miss the ideal range of 0.6–0.8. By testing small weight adjustments in PixAI, you find the weight that gives you exactly what you want.
LoRA Troubleshooting Checklist
Before you regenerate, run through this checklist:
☐ Trigger word present? Is the LoRA’s recommended trigger word in your prompt?
☐ Trigger word spelled correctly? No typos or creative variations—use the exact trigger word.
☐ LoRA weight reasonable? Between 0.5 and 1.0 for most use cases.
☐ Model compatible? Did you test the LoRA with a compatible base model?
☐ Prompt conflicts? Does your prompt ask for something that contradicts the LoRA’s intent?
☐ Multiple LoRAs fighting? Are other LoRAs overpowering this one?
☐ Simple baseline prompt? Have you tested with a minimal prompt to see the LoRA’s pure effect?
☐ One variable changed? When testing, are you adjusting only one setting at a time?
Final Thoughts
A LoRA not working is frustrating, but it’s rarely a sign of a broken LoRA file. Usually, it’s a matter of finding the right combination of trigger word, weight, base model, and prompt—and that takes testing.
The advantage of using PixAI is that you can test these variables online without installing anything locally. Adjust weights with sliders. Switch models instantly. Compare results directly. Iterate quickly. This speed of testing is what transforms LoRA troubleshooting from a frustrating guessing game into a systematic process.
Start with the fundamentals: verify the trigger word, test incrementally across weight values, confirm model compatibility, and simplify your prompt to eliminate conflicts. More often than not, one of these adjustments will reveal the real issue.
For more detailed guidance, check out the LoRA Trigger Words Guide and the LoRA Weight Settings Guide. And if you’re interested in creating your own LoRAs, PixAI provides tools to do that online—no local training required. Learn more in our guide on how to Train a LoRA on PixAI.
Artificial Intelligence – The Data Scientist